
glasses camera eyewear
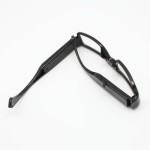

DETAILS
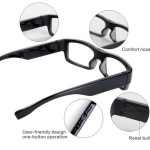
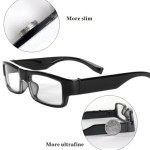
FEATURE
1. World’s first HD quality video camera eyewear with encryption read disk function
2. Brilliant and rich natural colors, high quality video images.
3. Flexible design suits for different faces for different races and ages.
4. Fashion and cool design keeps up closely with vogue steps.
5. A perfect embrace of fashion concepts and factors, Limited Editions available for picky trend-spotter.
6. 5 mega pixels CMOS camera for clear digital video recording.
Easy connection with PC/Laptops,no driver needed.
User friendly operation button for easy control.
Real time recording, never let memorable moments sneak away from life.
A must for trend-spotter, journalist, traffic police, travelers,hikers, mount climbers, students, life-lovers and etc.
SPECIFICATION
Product size 143*152*34mm (unfolded)
Physical weight Approx 35g
Read/write speed 1.5MBps-60MBps
USB 2.0 (High Speed)
Power supply Embedded 280mAh Li-polymer Battery
Power duration 1-2 hours
Power adaptor 5V DC/ 500mAh
Power consumption <0.8W
Memory 8GB built-in, max 32GB
Resolution 1280*720
Video format AVI
Audio Stereo
Lens specs 5 mega pixels CMOS camera
Recording speed Max 30fps
Working temp 0 ℃ – 60 ℃
Storage temp -20℃ – 80 ℃
Player Windows Media Player, Real player,Storm codec
Menu Language English/Chinese
Operating System WinXP, Win2000,Windows Vista, Win7
OPERATION
Before you do any operations,please load TF card first.
A) Time Setup
1. Connect device to PC or Laptop, it will be recognized as a newly added storage drive.
2. Click to open the newly added drive.
3. Right click your mouse and create a new text file under the root directory. Make sure NOT to create it under “video” folder.
4. Rename the new text file as “ time.txt ”.
5. Open the new text file, input the local real time as per the sample below:
If present time is local time: 10:10:10, 10th, Oct, 2010, then input time this way. 2010.10.10 10:10:10 Y/N ( YYYY/MM/DD HH/MM/SS Y/N )
6. You can add space Y after the time to enable time stamp on the video or input space N to disable it.
7. Save it and then exit
8. Time is set and ready for new recording.
B) Switch On
To start the device, press and hold the On/Off button for three seconds and then release, YELLOW LED indicator will light up,the device is in standby mode.
C)Video recording
When device is in standby mode, to start video record,press on/off button for two seconds,YELLOW LED indicator will blink 3 times then go off.it is recording.One more short press of the On/off button ,the BLUE LED indicator will blink for 3 times.the device is shut down,and files will be saved automatically.
D)photo taking
When device is in standby mode, short press on/off button to take one photo,meanwhile the YELLOW LED indicator blink one time.Repeated press to take more photo.
E) Auto shut-off
1.When the device is in standby mode,if you don’t process to take photo or video ,it will shut off itself in ten seconds .
2.When battery is low , yellow and blue LED lights will blink by turn for 3 times, device will save the files and then shut off itself.
3.When memory is full, yellow and blue LED lights will blink by turn for 5 seconds,device will shut off itself.
PC/LAP TOP CONNECTION
A) System Requirement
1. CPU must be at least 500Mhz above
2. Operating system: Win2000/XP/Vista/Win7
3. USB slot
4. Minimum 1GB free hard disk space
5. Minimum 512MB memory
B) Connecting PC or Laptop
1. USB Storage mode
a. When device is under “OFF” status.
b. Connect the device to PC or Laptop through USB port using USB cable provided in the kit.
c. The computer will recognize it as a newly added disk and shall install if necessary the driver.
d. After installation, a new window will pop up, click “Open to check files” and go to the folder that video stored in,namely “Video”, (you can also find the device as are movable disk under your Computer root directory),click the folder to enter, then you see a sub folder namely“100VIDEO”, click again to enter, you are able to find the video files that has been recorded stored under this folder and are ready for downloading to local disk.
e. You can then copy or cut and save to your local hard drive.
f. When finished, click to remove the storage disk safely.
POWER SUPPLY
A) If failed to start the device, in most cases the battery is flat and needs to be recharged. For initial three charges, you are kindly requested to charge the battery for at least 4-5 hours long to ensure its best performance in future. Please do not charge it for over 12 hours.
B) You can either charge the battery using USB cable or charge it thru USB AC adaptor. Usually a full charge takes approx 3 hours.
C) When charging ,The BLUE LED lights;when battery is fully charged,the YELLOW LED lights.After Yellow LED on ,it take another 90 minutes to get totally fully charged.
D) Please do not use other AC adaptors other than the one provided in the standard kit to avoid damages to the product.
E) If you haven’t use the device for a long period of time, we suggest you to recharge the battery first before use it.


